Sunday, November 10, 2013

My First Pattern: Color Burst Puff Coaster

The day has finally come. I've written my very first crochet pattern. Even though I've been crocheting for years, I only recently started reading and understanding crochet patterns. I was taught to crochet without patterns and created many beautiful things without patterns. I actually only recently learned that there was such a thing as a crochet pattern. Imagine my surprise when I was bogged down with learning the meanings of sc, dc, pc, ch, join, scblo, etc.

Needless to say, I learned how to do those things and understood what they meant. Now it's my turn to create my own pattern (and hopefully more in the future) to share.

If anything is unclear, please leave a comment and I will clarify!

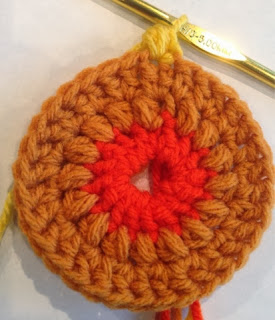
Color Burst Puff Coaster


MATERIALS
  • 5.00mm (US 8/K) hook
  • Approximately __ of THREE colors of acrylic, worsted yarn


MEASUREMENTS
  • Finished item using the suggested materials produces a coaster that has a 4" diameter.

GAUGE
  •  Gauge is not important in this pattern. If the finished product is too big, use a smaller hook. If the finished product is too small, use a larger hook.

ABBREVIATIONS (US Crochet)
  • Ch: chain
  • DC: double crochet
  • PS: puff stitch
  • slst: slip-stitch 
  • sk: skip

EXPLANATION OF STITCHES
  • Ch (chain): Yarn over and pull up a loop
  • DC (double crochet): Yarn over, insert hook into stitch, yarn over, and pull up a loop. Yarn over and pull through 2 loops on the hook. Yarn over again and pull through the remaining two loops on the hook.
  • PS (puff stitch): Yarn over, insert hook into stitch, yarn over, pull up a loop, yarn over, insert hook into stitch, yarn over, pull through all 5 loops on the hook.
  • slst (slip-stitch): Insert hook into next stitch and pull up a loop.
  • Magic Ring: This technique is really hard to explain without pictures. Maybe I'll create my own tutorial, but check out Ambassador Crochet's picture tutorial of the magic ring.

PATTERN

With the orange yarn, make a magic ring. Ch 1.


Round 1: 16 DC into the Magic Ring. Join with a slst into the 1st DC (Change colors while making the slst.) (16 DC)


Round 2: Ch 1.  PS in same stitch as join. Ch 1. *PS in next stitch. Ch 1.* Repeat from * to * around. Join with a slst into the Ch 1 space. (32 stitches)


Round 3: Ch 2 (Does not count as a stitch!). DC into same stitch. Sk next stitch. 2 DC into each Ch 1 space around. (NOTE: In order to get 32 DC around, you need to make one extra DC after the last PS before joining.) Join with slst into the top of the 1st DC. (Change colors while making the slst.) (32 DC)


Round 4: Ch 1. PS in same stitch as join. Ch1. *PS in next stitch. Ch 1.* Repeat from * to * around. Join with stst into the Ch 1 space. (64 stitches)


ALMOST FINISHED!!!


Fasten Off


If you have ANY (and I do mean ANY) questions or suggestions, leave a comment below.

Don't forget to check out my Etsy store for finished project!

Sunday, November 3, 2013

I sold my FIRST item on Etsy!

Less than two hours after I wrote my last blog post, I sold my first item on Etsy! It was such an exciting moment in my small business career! Even though it was my sister that bought something, it felt great to have the opportunity to send someone something I made from scratch. I could definitely get used to this.

When they say that it's hard to sell on the saturated market of Etsy, they mean it! I opened my shop on July 9, 2013 and it took almost four months to get to this point of having just one sale. By some standards, I'm par for course, even though it may not feel like it, but I have to continue telling myself that things will eventually pick up. How long is it going to take to get at least one sale every day OR even better, multiple sales every day?

I guess I should stay in more often to work on my craft. It'll be worth it in no time.

Welcome!

Hello! Welcome to my blog that is all about my needlework. I love to create handmade goods that can be worn or displayed in the home. One of my favorite childhood pasttimes was going to Borders (yes, Borders, NOT Barnes and Noble), searching through the kids craft books, choosing my favorite craft at the moment, from nail polish designs to paper twirled animals, spending hours at home "working" and selling or giving away my creations. As an adult, I specialize in crocheting and knitting, however, I have a slight preference for crocheting since it's easier on the tips of my fingers :)

When I was a little girl, my mom taught me to crochet small coasters and potholders, which I dutifully made for my teachers on holidays and just because. While in college, I picked up my needles again, and I also taught myself to knit during my summer breaks at home on my mom's couch. After graduating college and starting my full time job in a big city, I had to put my needles down because the realities of being an adult took over my life.

After two long years of working hard at my full time job, I picked up my needles and began searching for easy patterns this past summer. Once my tense fingers and wrists became re-accustomed to the ins and outs of using crochet and knitting needles, I thought I'd open an Etsy store to sell all of the scarves, hats, headbands, and coasters I was making. 

Almost four months after opening my first Etsy store (and ZERO buys), I realized that selling your homemade goods online was not as easy as I thought it was going to be. It was going to take more than just opening a store on the ever popular Etsy to get my handmade goods from the tables of my apartment to the homes of buyers.

Instead of sitting around and waiting for customers to come to me, I've decided to go full force with getting my product out into the world. That's why this blog was created!

This blog will be a behind the scenes view of my quest to turn a hobby into a career. Check back frequently for updates on my current knit/crochet/craft projects, thoughts on navigating the small business sphere, and successes/RANTS along the way.


Don't forget to check out my Etsy store (be my first buyer) and FOLLOW ME on Instagram!